It's amazing what can be done with a few skills! We really gifted ourselves this Christmas. We were having trouble with leaking, mold growing, wood rotting, and mushrooms forming around our shower in the master bath, so we knew that we would be tearing it out to find the extent of the mold growth. We were very alarmed due to the fact that our home is only four years old. Ever notice the rim on the vinyl shower bottoms? It is very flat around the outside edge which is a poor design to prevent water from leaking eventually toward the wall. Anyway, as this is our forever home, we decided that if we had to tear it out anyway, we might as well put in what we wanted, and I have always loved white marble. As we are improving around the farm, we keep asking ourselves how we can get things done in a way that it will last the rest of our lives. Marble
seems to satisfy that as well. So I shopped around to get the best price on
marble tile, bought a few basket weave marble tiles for the bottom and niche, and got a professional to put it in for us, due to the building of the shower pan. We love our new shower! I knew I did not want to put the glass shower door back up, as I was trying to eliminate cleaning issues for the next fifty years and not only was the glass a pain to keep clean, but the bottom track always seemed to look dirty no matter how often I cleaned. However, I did want to make sure I used a sheer fabric so the light would come through. I bought a set of white sheer curtains with gray embroidery on it. It is so sad how when you order curtains, none of them seem to come in at the length they said they were. These curtains were supposed to be 84" and they were 82"! So, I let out the top and bottom hems, added some fabric to the back of the top and added buttonholes to the top for the shower clips to go through. For the liner, it was short as well. I cut off the top with the grommets and added a band of fabric sewn to the top and to the shower curtain. To allow me to sew it without getting stuck on the plastic curtain, I had to use strips of paper between the sewing machine foot and the shower curtain. Once done, you wet the paper to take it off without pulling the stitches. I love the way it turned out. My handy husband installed a chandelier over the bathtub where we had a flush mount light. As he had to add a box in the ceiling to hold the new light, we found that a ceiling medallion covered the extra spaces and edges. It looks great, too!
A sustainable farm owned by John and Sherri Powell for the healthy production of pastured beef, pork, and chicken, as well as vegetables, fruit and nuts grown naturally, without added chemicals, unless approved by OMRI.
Tuesday, December 29, 2015
Tuesday, December 15, 2015
December 15, 2015
If you haven't figured it out by now, our family is a bunch of geeks. That is probably one reason why being sustainable appeals to us so much. The Christmas season is no exception to geekiness. In my last post, I showed you the wreaths for my children's doors - all unique to them. This time, I want to show you my husband's items for this last week of school. This week is spirit week, so there is a themed day for each day at Eastern Randolph. Monday - Candy Cane day, Tuesday - ugly Christmas sweater day, Wednesday - Christmas character day, Thursday - Flannel day, and Friday - Extreme red and green day. Of course, I hit the thrift shops to try to satisfy these requirements. What we usually do, is buy a tie. A tie is cheap at the thrift shops, and takes up very little storage space. When coupled with the fact that my husband likes to look professional as a teacher, a tie is a real winner. Of course, a tie doesn't always suffice. For the first day of spirit week, I looked for a tie with candy cane stripes. Not available. So I found one that was mostly red and white, brought it home, used scotch tape to tape off some stripes, and spray painted with some spare white paint. He did say that by the end of the day the paint fumes were getting to him just a little. He is such a good sport! I also sent him with a basket I bought for fifty cents, spray painted red, with some red and green striped mints (I don't know why the small candy canes aren't still available). So for $3.50 he was dressed for the occasion and had some candy to hand out ($1.00 each for the red mints and the green mints.) For Tuesday, it was ugly Christmas sweater day. Of course, we don't have one, so I looked at the thrift shop for this too, but was told they had been gone since they put them out in October. So I found a sweater to use for a base and decided I would have to applique something on it. Then I figured as long as I had to applique something on it, it should be pertinent to his class. Since he teaches physical science, I decided on a beaker, an erlenmeyer flask and a multimeter. I had some scraps to use for the stocking to hold them, then I appealed to my neighbors for yellow and gray for the multimeter. Thankfully, I have a neighbor who quilts and was able to help me out (it was so nice to have a reason to see her as well). From this was born an ugly Christmas sweater that I am afraid might become one of my husband's favorites. Wednesday is Christmas character day, so we are starting with a sweatshirt I made him last year with the Grinch on it. I bought some very small plastic zipper bags, so small they only hold eight red and green M & M's. They were only $1 for 100 bags (called boutique bags in the bead section at Wal-mart). I then printed some labels with the grinch and the words: "Grinch Pills Take two when your heart is feeling small." So for about $5.00 (the M & Ms were the expensive part) he will not only look the part, but have something to hand out to his high school students. The bags were so small, I had to cut the standard address label in two parts, putting the instructions on one side of the bag with the picture of the grinch on the other. As Thursday is flannel day, he will just wear a red flannel shirt he has, and Friday for extreme red and green he will wear a green shirt with a red tie that has green Christmas trees on it that he already has.
Tuesday, December 1, 2015
December 1, 2015
The Holiday season has been upon us and continues to reign. Thanksgiving was all about preparing for family to come to our house. We got the front door painted, the last touches on the front hallway, the stairwell painted and family photos hung (finally.) I prepared wreaths for our children to take home that matched their decor. Our youngest got one in royal blue and black, with a Santa Guinea pig (her favorite pet.) Our oldest received one in purple and silver with Jack Skellington, and our middle received one in red and black with dragons. Our Thanksgiving meal consisted of many entrees grown right here on the farm: string beans (we prefer Roma beans), creamed potatoes (we grow Corollas), sweet potato casserole (we grow organic covingtons), corn pudding (we found an organic silver queen this year) and okra pickles. Other items on the menu included: pumpkin pie, pecan pie, coconut pie, dressing, smoked turkey, spiral ham, homemade cranberry sauce, homemade rolls, fruit salad, beer (made by John), turkey cupcakes, and I'm sure I'm forgetting a few things. In addition to the regular holiday happenings, my husband has been working on our photovoltaic system, and now has it functional. We are currently running the barn/workshop totally from it, as well as wall sockets, lights, basement outlets/freezer, and smoke detectors in the house. We have finished out our solar panels on the tractor shed roof, as John was able to repair another couple of panels. We also picked up five new family members, as our black Australorps have not been doing a good job at laying eggs, so we went and got five buff orpingtons that are about 28 weeks old from one of our neighbors. Despite the fact that it is cold and daylight is dwindling, we are now getting four eggs per day.
Saturday, November 14, 2015
November 14, 2015
I just finished a chair for my Mom's office/bedroom. She has an old lawn chair in the corner with an electric massager in it. She likes the massager and uses it, so she wouldn't let me remove it from the room. Not only did the lawn chair look out of place, but the massager is not very attractive. I decided that if I found a chair and made a slipcover for it, she could put the massager on the chair and put the slipcover over it, leaving only a pretty bedroom chair in the corner of the room. I found this chair at a thrift shop for $5. I loved the curvy arms, as I was going for a cottage style since the twin bed in there has a white Mary Jane Bedspread with a wreath hanging over it that my mom likes. I used a Matelasse bedspread that we already had and was sitting around unused to make the slipcover. I needed a bow for the back to help it fit the chair nicely and did not want to go in to town just to buy a ribbon. I checked my fabric stash and I had a white sheet that I had already sacrificed for something else, but it still had the top of the sheet with a ribbon trim, as well as a little excess fabric. I decided it would work for the bow. Here is how the chair turned out. It looks so feminine. The back of the chair looks great, too. All for $5 and some work.
Sunday, October 25, 2015
October 25th, 2015
Yesterday, we traveled to my mom's to help her with a few things and just to enjoy our visit. While we were there, we managed to help her rearrange an office into a french cottage style bedroom/office. With zero dollars spent, the transformation was amazing. Previous to this visit, we had talked her into moving the bookcases out of this small space and turning her laundry room into a mudroom/library. This time we helped her put together a trundle bed for that room for free. We had an old oak captain's bed minus the drawers. A friend had given us a twin bed with mattress/box springs and a metal bedframe on wheels, along with a Mary Jane bedspread and pillow. We put the mattress on the captain's bed (that had a small box spring already). We put the bedframe on wheels under the bed and my husband used a piece of 3/4" plywood she had laying around to put a platform on it to house a mattress in a roll out trundle style. The Mary Jane bedspread had a skirt on it that concealed the trundle. We moved a huge desk down to the corner (that was blocking the door) and we re-housed her file cabinet in the closet that we cleaned out. It was amazing how much larger that room felt. We then went shopping at Lowes for an extension cord as we rearranged the paper shredder, a battery tap on light that can light up her file cabinet so she can see to file in the closet as the closet had no light, batteries for the light and a replacement door bell, which spent $20. The doorbell was not used in the room, but at the front door as hers was broken. My mom, as gracious as always, was a great hostess. She made us tacos for lunch and a yummy cake. She sent us home with a throw for cold evenings, as well as a chicken planter. I brought the planter home and painted it with some paints I had on hand, as I am working on a French country front porch. Stay tuned for that. Today we worked on the photovoltaics again. Finished insulating the battery shed while my husband worked on the wiring, tried to fix some panels that were not working properly, and tested out the new pressure washer. We also went to purchase three flats of pansies (I just love flowers that bloom during the winter, don't you?) Now is definitely the time to put in your pansies. They were on sale at a nearby nursery for $12 per flat.
Monday, October 19, 2015
October 19, 2015
Busy times. Well, we finished the secretary to match the side tables. Adding the same paint and changing the hardware made them look like a matched set. While there was lots of tlc involved, it was worth it to not only save the money, but to find better constructed pieces than are currently available unless you pay an extremely high price. The Hemingway room is starting to look quite nice. We found the ship's wheel mirror on Amazon. Yes, sometimes you just can't find a bargain item and even I have to buy it new. What a shame! The key is though to save money every chance you get so that when the time comes that a bargain is not available, you will have the money to spend when it's needed. Take the front hall for example, I could have spent $400 for the mirror, around $200 for the floating shelf (solid wood), $20 for the orchid, $99 for the light fixture (or more), but I found a used mirror for $25, spent about $12 on the lumber for the shelf, got the orchid as a gift, and bought a light fixture for $10 at the restore and painted it (notice that the shape nearly matched the mirror). Nearly the same look for about $673 less. I love the way it turned out!
Being that it's October 19th, we are having issues with frost here in the piedmont of North Carolina. We hurried out to pick everything we could before the frost. We ended up processing 6 gallons of sliced bell peppers, a five gallon bucket of Cayenne peppers (more than half strung to dry), ancho peppers, jalapeno peppers, the remainder of the basil (dehydrated and run through the blender), as well as two bushels of sweet potatoes. We have had the peanuts drying in the greenhouse, now it's time we pick those off the plants and replace them with the sweet potatoes to cure. We will never get bored here on this farm!
$10 foyer light |
Being that it's October 19th, we are having issues with frost here in the piedmont of North Carolina. We hurried out to pick everything we could before the frost. We ended up processing 6 gallons of sliced bell peppers, a five gallon bucket of Cayenne peppers (more than half strung to dry), ancho peppers, jalapeno peppers, the remainder of the basil (dehydrated and run through the blender), as well as two bushels of sweet potatoes. We have had the peanuts drying in the greenhouse, now it's time we pick those off the plants and replace them with the sweet potatoes to cure. We will never get bored here on this farm!
Saturday, September 26, 2015
September 26, 2015
While fall is in the air, it is not officially here. However, the persimmons are in! Here are a few persimmons we picked up today. These are wild persimmons from one of the trees that were surrounding our farm when we bought it. These had naturally fallen off the tree, so we knew they were ripe. As these are astringent, you do no want to pick them when they are not falling off the tree. Sometimes we will shake the tree to see which ones are loose enough to fall. If you have ever eaten a persimmon that is not quite ripe, you will know what not to do in the future with persimmons!
Another project this week was finding a mirror for our front hall. I have been trying to place mirrors in the dark spots to reflect more light. Additionally, I am trying to add a little more elegance to our front hall before Thanksgiving, when all of the extended family will be here. When I went looking online, I was amazed to find that the mirrors I gravitated towards cost up to $400 or more! I really wanted a round mirror between 24" and 35" (the size of the wall.) I really like the beveled mirrors as well, but of course they cost more. I went shopping at the local antique store and found a mirror that was not round but was octagon shape. I pulled out my trusty measuring tape that I carry in my pocketbook, and it was 28". While it was a color of frame I didn't like, I knew I could solve that problem with paint. After a look at the price tag, which said $25.00, I knew I had my mirror. I brought it home, taped it off, and spray painted it with metallic silver. I love the way it turned out. I am sorry that the picture shows a shadow from the beveled edge.
Being able to go to the garden to pick your dinner is the bomb! Tonight we picked grape and pear tomatoes, kale, carrots, peppers and grapes, so I knew a chef salad was on for dinner (along with eggs we got from our chickens.) You just can't beat fresh food!
The front flower bed is dwindling, but the red zinnias are still going strong! I just love zinnias for that very reason, they are so hardworking!
Thursday, September 17, 2015
September 17, 2015
Life is never dull and boring. I am loving life! I was born to be a jack of all trades and master of none! What I like about it is I see no limitations. I look around and see what needs doing and figure out a way to get it done. Who cares if I am a specialist? My husband is the same way. It's so awesome! For example, I needed a picture for our dining room in the colors of purple and green. I am sick to death of having meaningless art and my husband takes a great picture of a passion flower which is the first flower we saw on the farm. So I decided to paint a picture of it. As I tell my daughter, I am not an artist, I just play one on TV. Anyway, it turned out decent enough to hang it on our wall and bring color to our dining area in the great room space. Another project this week has been the lamp tables for our upstairs bedroom that used to be my youngest daughter's room before she moved out and went to college. I am trying to put together an Ernest Hemingway style bedroom as you can see by my pinterest page. I found two end tables at the thrift shop. One was priced at $8, and one was priced at $12. They matched, but were in a different amount of disrepair. They were solid construction with dovetailed drawers and more solid wood than you see in today's furniture, so I took a gamble and decided to paint them. I knew I would be changing the hardware to match a secretary I bought, so I sanded them, used wood filler where needed, painted them black, and oila! I can't wait to see how they look with the secretary. The other project I have been working on is some shorts for my husband. He is such a hard worker that he tears his clothes all to pieces. Couple that with the fact that his cargo shorts are too long so that when he bends down his knee catches the seam and rips it, and he needs some custom designed shorts. I went to a thrift shop and found a pair of khaki pants for $2. I cut it off at the spot that usually rips with seam allowances added, and made a pattern for a cargo pocket from an 8 1/2 by 11 sheet of paper. I hemmed them at the right spot and added the cargo pocket, so we had a pair of shorts for $2 that should outlast the $40 cargo shorts that you can find advertised. I used the 8 1/2 by 11 sheet of paper so I could manage hemming and seam allowances. They turned out great.
Love these shorts!
Love these shorts!
Monday, August 31, 2015
August 31, 2015
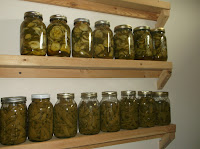
What a busy summer, which has now come to an end for us as my husband has gone back to his teaching job. I am still doing my job as a financial consultant, but am tailoring down my hours. Our life here at the farm has been symbolized by this humble passion flower that has been growing here since before we came. We are very passionate about this farm and becoming self-sufficient in our lives. This summer's project has been all about putting in our solar power and we are not quite finished. It is our hope to be off the grid one day. We have built our tractor shed with a slanted roof to accommodate our solar panels, and have mounted 70 of the 72 panels that we intend to have there. The final few will have to be repaired first as they were not showing the voltage that they should. To that end, we purchased some wire glue from thinkgeek.com We needed some adhesive that would conduct electricity, so we will let you know how that comes out. My husband has done a great job with the wiring (and I helped). We have built the battery shed, and this last weekend, we connected the wiring and dug to lay the conduit 18" below ground between the tractor shed and the barn (where the charge controller is housed.) All the while, we have continued to can and freeze. Our pantry shelves are getting full as you can see by the picture. We have also put many items in the freezer, including some additional spaghetti sauce as well as some condensed tomato soup (new this year.) In addition, we are planning a large family Thanksgiving, so I am getting the house ready with a little bit of an update. The downstairs will be a consistent olive green and aubergine throughout. Currently, I am working on some slipcovers for the chairs. I have complete the sofa pillows and a throw for the cold winter weather.
Thursday, August 13, 2015
August 13, 2015
What a busy summer! With the tractor shed finished, we set to work adding our solar panels in our ongoing quest to get more self-sufficient. We are almost finished, but every time we think we are almost there, something else crops up. This is when we were getting started. We bought a bunch of used solar panels with the intention of putting up 72 of them. We bought a prewired box that came with the circuit breaker boxes. We are trying to put in a 48 watt system. Our son who is an electrical engineer, is giving us advice and help to set up the system safely. As they were used panels, the first thing we had to do was clean them so the panel could see as much light as possible. Then we brought them out into the light to test the voltage. All except for a few, we were getting from 18 - 20 volts from. We currently have up 17 four panel sets (they are 12 volts and we had to connect them in a set of four for 48 volts.) All the while we were doing this, we moved our youngest into her new apartment and we have been putting up vegetables from the garden. Leah Apartment on my pinterest page that you can access from the pinterest button on this page has picture's of my daughter's apartment. We have put up 33 quarts of corn, 6 gallons of sliced bell peppers, a couple of assorted other sliced peppers and some blueberries in the freezer. We have made about 16 quarts of spaghetti sauce, about 23 quarts of green beans, 6 quarts of squash, about 8 quarts of bread and butter pickles, and about 10 pints of okra pickle.
Thursday, July 23, 2015
July 23, 2015
The black oil sunflowers are blooming at the farm. The goldfinches are getting their fill. We are also blessed with lots of garden produce. John picked a trailer full of corn yesterday and has been busy shucking, cleaning, blanching, cutting them off the cob (some were left on the cobb), and putting them in the freezer. We had some yummy corn fritters for dinner last night. For breakfast this morning, we had some bacon, sauteed potatoes, carrots, red onion, and basil from the garden, along with some watermelon and honey dew melon. Life is good!
So far this year, we have canned roma beans, squash, and pickles. We have frozen corn, bell peppers and blueberries, and we have put in the root cellar (basement) potatoes and butternut squash. Our cup runneth over! Our tomatoes are just starting to ripen and have provided us with some sandwiches so far. We have planted some sweet potatoes, carrots and squash.
We have had plenty of rain. In addition to all the garden duties, we have been gathering the remaining materials we need to start mounting the solar panels on the roof of the tractor shed. My son, who is an electrical engineer, is helping us design the system which we hope to implement at the end of this month. Additionally, I am getting ready for a visit from my mom, and I have finished my first slipcover on a chair. I am amazed at how well it turned out! The slipcover fits the chair so well, it is difficult to tell that it is not upholstery. I don't know why I haven't tried this before. I love the ability to take it off and wash it! My husband and I also put the finishing touches on the sewing armoire, with the last coat of white semi-gloss paint and spray-painted the handles black. It's so pretty, you wouldn't suspect it holds a fold down sewing table in addition to providing storage inside.
Tuesday, July 14, 2015
July 14, 2015
So, at the farm recently, we have been building the tractor shed. First John measured for the footprint and dug the holes with the auger on the tractor and the post hole diggers. Then he set up a level string to measure to the depth of the hole to figure out where to cut the upper notch in each pole. Then he put in the poles and used stakes hammered in the ground and braces to level each pole. Then we added two 2 x 10 beams to each of the north and south sides, sitting in the notch of the pole. After that, we put up one rafter to figure out where we wanted to put the bird mouths on each rafter, and used that one for a template to cut out the other 11 rafters. We used one every two feet, which made for 12 rafters. We used a measurement of 20'11" so the 7 three foot metal roof panels would fall evenly with a little overhang on each side. After the rafters, we put on knee braces, bridging, and a wood tie between the bridging and the beams to hold in a strong wind. We cemented in the poles at this point and left them to dry overnight. Then came the roof sheathing, with the metal roof panels on top of that and screwed on every 2 feet or more. Yay! A finished tractor shed that will also provide a roof to install our solar panels on!
Wednesday, June 17, 2015
June 17, 2015
New Weathervane |
After/before stacking chairs |
I also came up with an idea today of making a coat rack out of a scrap piece of wood, some old knobs and some silver paint. I finished a pair of curtains and two pillows for the chairs. Most of this stuff I am posting on my pinterest page, so you will get a better idea of how it looks together if you look there. There is a link on this page. We are picking zucchini squash, yellow squash and raspberries right now. The beans are almost ready to be picked. Don't forget to check out the updated picture of the Solar Water Heater collector.
Coat rack from spare wood and knobs |
Hercules and Phoenix |
New pillows that match curtains |
Monday, June 8, 2015
June 8, 2015
Homemade TV Antenna |
Table made with drop leaf cocktail table |
Friday, June 5, 2015
June 5, 2015
Lots of miscellaneous things are happening here on the farm. The potatoes are about ready to dig, raspberries are ripe, blueberries are ripe, the garden is coming along nicely with corn, squash, melons, tomatoes, pepper, basil, eggplant, carrots, cucumbers, romano beans, sunflowers,and okra. The asparagus is done, the strawberries are taking a break, the blackberries are ripening, the grapes are forming on the vines, and the hops are growing. The fruit and nut trees are looking good this year with the exception of one of the almond trees and a cherry. The fig trees started over from the ground this year. The little crepe myrtles are doing well along the driveway. The water hyacinths my kids gave me for the pond are blooming.
Our youngest child is moving to her first unfurnished apartment, so we are trying to help her gather some furniture. In looking at ideas for furnishing a very small apartment, I loved the drop leaf round storage table from Ana White's site. We are attempting a similar version starting out with a drop leaf cherry cocktail table, making the shelving component, and putting the two together. The next steps are to add wheels, remove the Queen Ann legs from the coffee table and attach the shelving unit, and paint the bottom assembly black. We will work on the platform bed next. We plan to make it with 2 x 4's (more economical and less weight in case we have to help her move a few times.) We are also going to make the legs longer so we can fit in a drawer piece that we have leftover from a twin Captain's Bed that my mom needed without the drawers so she could fit in a trundle bed.
Subscribe to:
Posts (Atom)